


Rubber Bands, Duct Tape, and Hives - Your Guide to the Windows Registry
In some Windows troubleshooting articles you’ll find a suggestion to fix a problem that involves editing the Windows registry. There’s always a dire warning attached, along the lines of, “Do not attempt to edit the registry unless you know what you’re doing! One wrong registry edit can render your machine unusable!” That's true, but with a bit of caution, you CAN safely edit the registry. (Just beware of hives.) Here's what you need to know, and some helpful examples... |
Afraid To Edit Your Registry? Don’t Be…
It's always good to start with a definition. I like to call the Windows registry "a hideously complex ball of string, rubber bands, duct tape and baling wire that's supposed to keep track of Windows system settings, your hardware configuration, user preferences, file associations, system policies, and installed software." It was intended to be an improvement on the simple text-based INI files that stored Windows configuration settings, but apparently too many pocket protectors were involved in the design.
One advantage of the registry is that it enables each user of a machine to maintain his/her own settings; each user can have a unique theme, speaker volume setting, set of apps, and so on. But the registry can also apply settings to all users, or a group of users specified by the system administrator (e. g., “adults” and “kids”). The registry is one of the most important files on your hard drive. On the downside, this “all eggs in one basket” approach can lead to problems if the registry is damaged or edited incorrectly.
It may be necessary to edit the registry to correct an error or corruption; to add or change a setting that is not part of the original design; or to prevent some system activity that is undesired. The registry is a very powerful tool, and if it’s used incorrectly, YES, it can wreak havoc on your system. But with a basic understanding of how it works, and some simple precautions, you need not fear. (Rumors that it may use subspace field harmonics to scratch your CDs or turn your screen an interesting shade of mauve have been fully debunked.)

The first rule of editing the registry is, “Backup Your Registry!” You can make a backup of your registry by creating a System Restore point. To do so, click Start, type create a restore point, press Enter, and follow the prompts. On some Windows 10 and Windows 11 systems, System Restore isn’t turned on. See my article Will System Restore Cure Your PC Problem? to check if System Restore is enabled, and turn it on if not. Another method of backing up the registry is to use the Export function in the Regedit utility (see below).
Even if your Windows installation becomes unbootable, you can recover your old, working registry using the tools on the System Recovery USB drive that you created. If you have not created one yet, here are my instructions for how to do it on Windows 10 or 11. (For Windows 7 or 8.1 users, see HOWTO: Make a System Repair Disk, NOW!
)
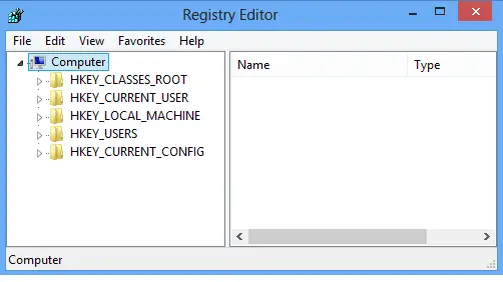
RegEdit is an app included with Windows to help you edit the registry. Type regedit in Windows start/search box, then press Enter. You may see a popup that says "Do you want to allow this app to make changes to your device?" Click YES (no changes will be made at this point). The open Regedit window will look something like the screen shot below:
A few paragraphs earlier, I mentioned that you can make a backup of the registry by using the registry editor. Let's do that now. Click File, then Export. In the lower left corner of the new window that opens, select "All" under Export Range. Enter a filename, and click the Save button. It will take a minute or so to create the backup. Don't be surprised if the lights flicker, and you hear a deep, guttural moan, followed by a hissing sound emanating from your computer. (If you see smoke, call the fire department.)
Kidding aside, when returning to the registry editor window, at the top left corner we see a link containing the word “Computer” -- think of that word as the trunk of a tree. Beneath it, in the left-hand window pane, we see the names of five branches: HKEY_CLASSES_ROOT, HKEY_CURRENT_USER, etc. Click on any of these brahch names (called “keys”) to see what further branches lie below it. Keys can be nested up to 512 levels deep. We won’t be going that far!
The prefix “HKEY” indicates a registry “hive,” the top level of this hierarchical database. “CLASSES_ROOT,” “CURRENT_USER,” etc., are names for hives, each of which contains more levels of data that are all logically connected to the hive’s subject. “HKEY_CURRENT_USER” is a hive that contains settings which apply to whoever is currently logged in to the computer. If you click on that hive name to expand the tree below it, you will see familiar names like “Control Panel,” “Printers,” etc., along with mysterious labels of system resources that most users don’t need to know about.
You may recall that I mentioned hives in the opening paragraph of this article. A weird thing happened to me as I was using the registry editor a while ago. A wasp flew into my office and stung me on my finger! I'm not saying it came from a registry hive, but it was 2020. I’m just glad it wasn’t a murder hornet.
What you do need to know is that it is critically important to make edits in the correct hive and the correct sub-branch of that hive. A change to HKEY_USERS instead of HKEY_CURRENT_USER may have unintended consequences for all users of a machine, not just you. Navigating the tree structure of the registry must be done with the utmost care.
Some Registry Tweaks You Can Try
Fortunately, there are lots of helpful geeks who provide exactly the right paths to take you where you need to go in the registry. In my articles, you may find instructions such as “navigate to \HKEY_LOCAL_MACHINE\SOFTWARE\Policies\Microsoft\Windows…” Just highlight the path name, copy it, and paste it into the address bar at the top of the regedit window. Once you are in the right place, most registry tweaks involve enabling or disabling something. The “something” may have a key at the end of a registry path like the one above, or you may need to create one for it. The instructions provided by your friendly geek should tell you what to do, step by step.
For example, to change the border width of your windows, navigate to HKEY_CURRENT_USER\Control Panel\Desktop\WindowMetrics. Set the values of BorderWidth and PaddedBorderWidth to 0 to eliminate the borders. Or increase the numbers to make the borders fatter. Valid values for BorderWidth are 0 to -750, but any number larger than 100 will be produce unusable results. Valid values for PaddedBorderWidth are 0 to -1600. PaddedBorderWidth should be larger than BorderWidth. For some reason, both of these numbers must be negative. The more negative, the fatter the borders. A reboot is required for the changes to take effect. Watch out for wasps while your computer restarts.
It's also possible to make changes to the registry with a REG file that someone else has coded for a specific task. A REG file contains the instructions for making a specific registry edit, and will do the magic for you without having to open the registry and edit it manually using RegEdit.
For example, you can add a new option "Open with Notepad" to the context menu that appears when you right-click on a filename. This is handy when you want to quickly edit a file that doesn't end with the .TXT extension. Download this ZIP file file, click to open it, and then double-click on the Open-With-Notepad.reg file. Click your way through a few "Do you really want to do this?" prompts, and it will add a key to your registry. Now you can open any file (regardless of the extension) with the Notepad editor, using the context (right-click) menu.
Here's one more. If you're using Windows 11, you've probably noticed that the File Explorer right-click context menu is annoyingly different. The Windows 11 context menu has a slimmed-down list of options such as View, Sort by, Refresh, and a few others, but they've hidden some of the ones I use most, such as Cut, Copy, Delete, Print, and Rename. You have to Click "Show more options" at the bottom of the list to get the full set of context menu items you had in Windows 10. You can use this registry tweak to restore the Windows 10 right-click context menu on your Windows 11 system. As in the above example, you click to download and open a ZIP file, then double click the REG file to apply the change. The ZIP file also contains another REG file to undo the change if you wish.
So now you (sort of) know what you are doing in the registry. Just make sure you always start by backing up your existing registry, even if you don’t plan to change anything but are “just looking around.” And watch out for wasps. Your thoughts on this topic are welcome. Post your comment or question below…
regedit, registry editor, registry backup, Windows 10 registry tweaks, registry hacks
This article was posted by Bob Rankin on 26 May 2023
| For Fun: Buy Bob a Snickers. |
|
Prev Article: Geekly Update - 04 May 2023 (giraffes ahead...) |
The Top Twenty |
Next Article: How to Erase Your Hard Drive - Going Nuclear? |
Post your Comments, Questions or Suggestions
|
Free Tech Support -- Ask Bob Rankin Subscribe to AskBobRankin Updates: Free Newsletter Copyright © 2005 - Bob Rankin - All Rights Reserved About Us Privacy Policy RSS/XML |
Article information: AskBobRankin -- Rubber Bands, Duct Tape, and Hives - Your Guide to the Windows Registry (Posted: 26 May 2023)
Source: https://askbobrankin.com/rubber_bands_duct_tape_and_hives_your_guide_to_the_windows_registry.html
Copyright © 2005 - Bob Rankin - All Rights Reserved
Most recent comments on "Rubber Bands, Duct Tape, and Hives - Your Guide to the Windows Registry"
Posted by:

LenB
26 May 2023
Hi Bob,
You mentioned backing up the registry by creating a System Restore point and hopefully most people who edit the registry will know how to use this to restore their PC if things go wrong.
However, you also suggest exporting the registry. That's quite easy to understand. What is not obvious (to me) is how I could use the exported file to restore the registry, particularly if Window has crashed. Please would you enlighten me.
Thank you,
Len
Posted by:

NightwishFan
26 May 2023
After deploying Winearo, and making my Taskbar Large again, I used to go into the Registry and change the number of System Tray rows from 1 to 2.
It no longer works; so now my icons are splayed out across the Taskbar, taking up a lot of space.
It seems like every time I learn how to do something really cool, they come along and plug it up.
I've sent them Feedback begging them 'pretty please' to please change it so that those of us who know how can continue to change the row number from 1 to 2. And yes, I did it from the ADMIN account; it no longer works.
Posted by:

Stephen
26 May 2023
@LenB,
If your system has crashed such that you wish to go back to the saved registry, you can use the IMPORT function of the registry editor. Once the system is back running, you can run the editor, then IMPORT the exported registry file you had saved. The import function prompts for the file. Select it from where you saved it, and import it.
You should then reboot your system to ensure the restored registry is used.
I hope this helps.
Posted by:

Gary L. Rickle
26 May 2023
Thanks for right-click context menu on your Windows 11 system. Great tweak.
Posted by:

Ken H
26 May 2023
Your instructions don't work on my Win 11 Pro NUC.Recovering Product Key doesn't work either with Powershell or ProduKey (Windows doesn't like this program, even with my override it wouldn't run.)
Posted by:

bb
26 May 2023
Windows11 right click: Cut, copy, paste, and delete are still there! But they're now icons, not text. And yes, I missed this too when first using it.
Posted by:

Brian B
27 May 2023
Restore Point, in my opinion, and from experience, is the worst piece of software ever written. Most times when I have tried to use it in the past, it tells me, after a significant wait, that it is unable to create said restore point. On the few occasions it did create the restore point, when trying to restore, it tells me it is unable to restore the point. So unreliable as to be useless. I prefer to rely on Macrium Reflect for restoring my computer to a former state, malware proofing my system.
Posted by:

Dennis W.
27 May 2023
Brian B. thank you for reminding me that I also have Macrium Reflect (for years now) running quietly in the background...
Posted by:

Bob K
27 May 2023
Brian B: Restore Point, in my opinion, and from experience, is the worst piece of software ever written.
Oh so true, so indubitably true. Thank you.
Posted by:

SamG
28 May 2023
No matter how many times Restore is PERFORMED, in Windows XP-11, the restore files disappear. After a Microsoft OS update. Backup with Macrium works. Almost every time. And since XP I feel Microsoft's newer OSs have not been an improvement.
Posted by:

Oldster
28 May 2023
I have used the registry editor (regedit.exe) on many occasions to tweak or fix my system. I currently dual-boot Windows 11 with Fedora Linux (the KDE spin). Fedora sets the system clock to local time in compliance with how Windows behaves in a dual-boot scenario. Other distributions don't. To accommodate those distributions, I found a registry hack to make Windows (10 or 11) set the system (hardware) clock to UTC. In the registry editor, I navigate to 'HKEY_LOCAL_MACHINE\SYSTEM\CurrentControlSet\Control\TimeZoneInformation', then add a new DWord value named 'RealTimeIsUniversal', then reset its value to 1 to enable Windows setting the hardware clock to use UTC time.
Alternatively, in an Administrator Command Prompt run:
'reg add "HKEY_LOCAL_MACHINE\System\CurrentControlSet\Control\TimeZoneInformation" /v RealTimeIsUniversal / d 1 /t REG_DWORD /f' (no single-quotes).
If you try out a GNU/Linux distribution, and you encounter this issue, you can use this registry edit, or in your GNU/Linux installation, you can edit the last line of '/etc/adjtime' with admin (root) privileges to contain 'LOCAL' rather than 'UTC'. In a terminal emulator, use 'sudo nano /etc/adjtime' to edit the file with the nano editor. If the terminal reports an error regarding sudo, then switch to the root account using 'su', then enter your root (administrative password) and use 'nano /etc/adjtime'. Edit the last line to contain 'LOCAL' (no single quotes). To save your changes, press 'CTRL+X', then press the 'y' key to confirm writing your changes to the file. Your changes will then be saved.
As you can see, there are several ways to make changes in both Windows and GNU/Linux. Which method you choose is up to you. The only thing that matters is that your system works as you want it to when you finish.
I hope this helps others,
Ernie
Posted by:

Frances
05 Jun 2023
With regard to the "are you sure you want to do it?" nag, I had an Amiga 3000 for which I required floppy disks for transferring programs from the internet. I was on Windows and needed to format a floppy disk so I asked Windows to do it. It should have been able to do so because it could read the floppies and recognized my USB floppy drive. But it got all bashful and kept asking me if I really wanted to do that. I gave up and did the formatting on the Amiga which had a program which formatted disks in MS-DOS. (Called CrossDos) It was faster even considering I had to move myself to another location then boot the Amiga.